I've posted some videos where I've used a special "painting rig" that I made. Up until now I hadn't described what it was, but basically is a Gimbal mount. Here's a video showing how to make your own for about $10. Links to the other videos are:
http://www.miniwargaming.com/content/finecast-cockatrice-painting-tutorial
http://www.miniwargaming.com/content/warhammer-fantasy-tomb-king
Showing posts with label diy. Show all posts
Showing posts with label diy. Show all posts
Deff Copta + Lego = Warbuggy
Here's a conversion I did based on Bad Donkey Gaming, here:
http://www.baddonkeygaming.com/2011/01/deffkopta-to-buggy.html
http://www.baddonkeygaming.com/2011/01/deffkopta-to-buggy.html

Jungle Bases Video
A how-to video of those jungle bases I did. Nothing too fancy, but I walk through all the steps I took.
DIY Modular Table complete videos
Here's the finished videos for the modular table that I made for about $25.


Jungle bases
To go along with the table I'm building I've made some jungle bases. I saw some plastic shrubs in the dollar store, and I had some of the GW Jungle Trees (two packs worth), so I figured I'd make two bases worth. I initially thought I'd split the trees and shrubs half and half, but once I was wrapping up the project I decided to put the shrubs on one stand and the trees on another.
The jungle trees have magnets on them so I can take them off.

The jungle trees have magnets on them so I can take them off.
DIY Weathering powders
So I've been really interested in getting some of the weathering powders that seem to be the rage lately. Unfortunately there aren't any local retailers that carry them, and shipping to Canada has killed any other deals. So, I pulled some old ideas out of my scale model history and decided to give soft pastels a shot. Note, these are not oil pastels, and are very similar to chalk (in consistency). Anyway, I picked up the cheapest package at my local Michael's craft store (with a 40% off coupon of course) and gave it a shot. Here are some pictures of my results. No black magic here... I just scraped the powder with the edge of an exacto knife, applied it with a big brush and used mineral spirits to wet it after.
The results are ok, but I think that's partly due to the lack of colour options. I'll keep experimenting and let you know.


The results are ok, but I think that's partly due to the lack of colour options. I'll keep experimenting and let you know.
Movement trays (again)
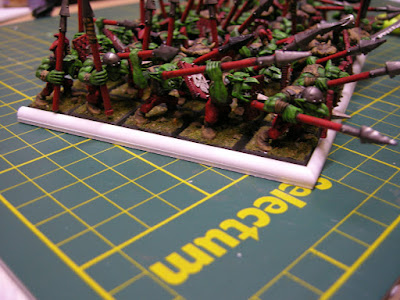
Ok, I've written about making movement trays before, but I think I've finally figured out a design that is simple, durable and inexpensive. I used plasticard sheets (0.060" thick) and 3.2mm 1/4 round rods (it'd be a circle with 6.4" diameter cut in 4 equal sections). A little magnetic paint and some rare earth magnets on my bases and I'm good to go. Now I can make tons of different movement trays for much less than the GW modular tray set. Well, if I count the magnets into the price its still probably about half the cost and I'm further ahead of the game. I wrote an article for the members section of www.miniwargaming.com, so I can't write all the instructions here, but I will post a couple pics.


DIY Magnetized movement trays
Here's a follow up to the previous diy movement tray article. What I've done here is cut out a fridge magnet to size and added rare earth magnets to the bases. The sheet magnet is from the dollar store (it had a sleeve for a 4x6 photo), and cuts easily with scissors or a knife. The other magnets are the rare earth type available at store.miniwargaming.com. The ones used here are larger ones, but I'll have to use small ones for the smaller bases of the night goblins. A green stuff (or putty) and super glue is used to attach the magnets to the bases. I've done the same thing with all my 40k Orks so that I can transport them in cookie tins. The magnetic sheet is ok, but the magnets would actually stick better to a sheet of metal. I'm still trying to source out an inexpensive and easy way to do it that way. I also have magnetic paint, so I'll be giving that a try in the future as well.


Work area
Here's a couple pictures of my hobby work area. I've made small work area like the GW paint stand out of wood (2' square from home depot less than $5). The main thing though is the light. I was able to pick up an "Ott Lite" on clearance at Michael's craft store a while back. In the past I've used a regular desk lamp, but from this I'd say its totally worth the extra $$$. The light source is colour balanced and extended, so you get accurate colours and no glare (which helps reduce eye strain). You can get other lights like it from Canadian Tire or Walmart for around $30. I first saw these at Games Day, and I highly recommend it to anybody doing a lot of painting.


DIY Devlin Mud
Ok, so we all know Devlin mud is talent in a bottle... so I'm a little inspired to try and replicate that in a DIY form. Over on Dakkadakka.com there is an article about using Paynes Grey liquitex paint to make a replacement for Badab black (ink wash). So, I'm giving Burnt umber a try. I have the soft body Liquitex paint, some flow improver and distilled water. I think the Devlin mud has some black in it, so I added what I had. My results aren't quite conclusive, but I think I'm on to something. I gave my giant a coat of it to evaluate.


Scratch built Big Shoota conversion
Here's a couple pictures from a tutorial I wrote for miniwargaming.com. Basically just some plastic tubing that I picked up at my local hobby shop, some holes and some bits from the bitz box. Now I just need to make a pile of these so I have a whole squad of Deff Koptas with twin linked big shootas.


How to: Space Hulk Terminator base magnetization
Here's how I went about magnetizing my Space Hulk Terminators so that the can be put on 40mm bases for 40k, but also used without the bases for Space Hulk. I'm sure there are other ways to do this, but here's one way to skin the cat. This article was orginally written for miniwargaming.com.
What you will need:
Space Hulk
1/16" x 1/32" Magnets (2 per terminator)
1/8" x 1/16" Magnets(2 per terminator)
1/4" x 1/16" Magnets (Optional, 1 per terminator)
Green Stuff (only a tiny bit is needed)
40mm bases (1 per Terminator)
Hobby Drill (with 1/16" bit)
1/8" drill bit
Sand paper or file
Hobby Knife
Step 1:
Remove terminator from sprue and file the base flat.


Step 2:
Drill 1/16" holes in base right under feet. You don't need to go too deep, only about half way through the foot, not as deep as I went in the second picture (I'll have to fix that with green stuff).


Step 3:
Drill a shallow hole in the same spot with the 1/8" drill bit (do this by hand). You only need it about 1 or 2mm deep, just enough to make a pocket for the top of a magnet to catch. Notice that the 1/16" hole is still visible and goes a bit deeper.

Step 4:
Drill 1/16" holes in the 40mm round base in line with the holes in the terminator's feet. Enlarge these to 1/8" holes. If they are slightly out of line you can enlarge them with your hobby knife. Green stuff will be used, so it's ok if they are a bit big.

Step 5:
Make up a small bit of green stuff. A pea sized ball will be enough.

Step 6:
Get aside your magnets, and make sure they are inline. This is how they will end up:

Step 7:
Put a small amount of glue on the top 1/16" magnet and put it in the hole. The 1/8" magnet will help you position this, and it should stick out below the bottom of the terminator's base. Be careful how much glue you use, as you don't want the 1/8" magnet to stick to the Terminator.

Step 8:
Put the 40mm base on, and add a bit of Superglue.

Step 9:
Squish two small balls of green stuff over these magnets. Make sure you don't push the magnets through. You can flip it over and push the terminator down to make sure it is flat on the round base.

Step 10 (Optional):
This step is added so that I can use cookie tins to transport my guys. Check the other article in my channel for a tutorial on this.
Add some super glue and the rest of the green stuff and squish the 1/4" by 1/16" magnet to the base. Let it stick down a bit and squash it in place by pressing the base on a flat surface.

All done!

What you will need:
Space Hulk
1/16" x 1/32" Magnets (2 per terminator)
1/8" x 1/16" Magnets(2 per terminator)
1/4" x 1/16" Magnets (Optional, 1 per terminator)
Green Stuff (only a tiny bit is needed)
40mm bases (1 per Terminator)
Hobby Drill (with 1/16" bit)
1/8" drill bit
Sand paper or file
Hobby Knife
Step 1:
Remove terminator from sprue and file the base flat.
Step 2:
Drill 1/16" holes in base right under feet. You don't need to go too deep, only about half way through the foot, not as deep as I went in the second picture (I'll have to fix that with green stuff).
Step 3:
Drill a shallow hole in the same spot with the 1/8" drill bit (do this by hand). You only need it about 1 or 2mm deep, just enough to make a pocket for the top of a magnet to catch. Notice that the 1/16" hole is still visible and goes a bit deeper.
Step 4:
Drill 1/16" holes in the 40mm round base in line with the holes in the terminator's feet. Enlarge these to 1/8" holes. If they are slightly out of line you can enlarge them with your hobby knife. Green stuff will be used, so it's ok if they are a bit big.
Step 5:
Make up a small bit of green stuff. A pea sized ball will be enough.
Step 6:
Get aside your magnets, and make sure they are inline. This is how they will end up:
Step 7:
Put a small amount of glue on the top 1/16" magnet and put it in the hole. The 1/8" magnet will help you position this, and it should stick out below the bottom of the terminator's base. Be careful how much glue you use, as you don't want the 1/8" magnet to stick to the Terminator.
Step 8:
Put the 40mm base on, and add a bit of Superglue.
Step 9:
Squish two small balls of green stuff over these magnets. Make sure you don't push the magnets through. You can flip it over and push the terminator down to make sure it is flat on the round base.
Step 10 (Optional):
This step is added so that I can use cookie tins to transport my guys. Check the other article in my channel for a tutorial on this.
Add some super glue and the rest of the green stuff and squish the 1/4" by 1/16" magnet to the base. Let it stick down a bit and squash it in place by pressing the base on a flat surface.
All done!
DIY movement trays
Here's my first stab at DIY movement trays for my WFB orcs and goblins. Its all illustration board and a bit of PVA glue. I've given some a coat of textured spray paint to see how that would look. The ultimate goal is to magnetize them. I think the way I'm going to do that is using a magnetic sheet (from the dollar store, the type for putting things on your fridge) and small magnets in the bases of my guys (stuck on with green stuff).


Subscribe to:
Posts (Atom)
